

Getting Started With Django
Building a sample website using Django-Python Framework

Setting Up The Environment
-Step 1
Make sure ‘python’ is installed correctly. Use the command below and type:
python3
-Step 2
To avoid polluting our global scope with unnecessary packages, we are going to use a virtual environment to store our packages. One excellent virtual environment manager available for free is virtualenv. We will be using Python's package manager pip to install this and other packages like Django which we will require later on. Use the command below to install virtualenv:
pip install virtualenv
-Step 3
Now create a folder anywhere you want and then get inside that directory using cd:
mkdir MyProjectscd MyProjects
-Step 4
Once inside the ‘MyProject’ folder, create another folder MyApp that will hold our app.
mkdir MyApp
-Step 5
Now let’s create a virtual environment at this location to hold our requirements.
cd MyAppvirtualenv myenv
Once this is done, you will find myenv folder inside your MyApp folder.
-Step 6
Now you are ready to activate the environment
myenv\scripts\activate.bat
Note : For mac,
source myenv/bin/activate
Now you will see a prompt with the environment name. This means, the environment is active.
Installing Django
Use the simple command to install django.
pip install django
Creating an App
Creating a skeleton project in Django is simple by using its admin script as:
django-admin startproject helloapp
Now this command will create a skeleton django app. Feel free to check the folder structure and all the files inside the helloapp folder.
When you look into the helloapp folder that was created, you will find a file called manage.py and another folder called helloapp. This is your main project folder and contains the project's settings in a file called settings.py and the routes in your project in the file called urls.py. Feel free to open up the settings.py file to familiarize yourself with its contents.
Changing App Settings
Let's change a few settings. Open up the settings.py file in your favorite editor. Find a section called Installed Apps which looks something like this.
# helloapp/settings.py
INSTALLED_APPS = [
    'django.contrib.admin',
    'django.contrib.auth',
    'django.contrib.contenttypes',
    'django.contrib.sessions',
    'django.contrib.messages',
    'django.contrib.staticfiles',
]
Django operates on the concept of apps. An app is a self contained unit of code which can be executed on its own. An app can do many things such as serve a webpage on the browser or handle user authentication or anything else you can think of. Django comes with some default apps preinstalled such as the authentication and session manager apps. Any apps we will create or third-party apps we will need will be added at the bottom of the Installed Apps list after the default apps installed.
Before we create a custom app, let's change the application time zone. Django uses the tz database time zones, a list of which can be found here.
# helloapp/settings.py
TIME_ZONE = 'Asia/Kathmandu'
Creating your own app
It is important to note that Django apps follow the Model, View, Template paradigm. In a nutshell, the app gets data from a model, the view does something to the data and then renders a template containing the processed information. As such, Django templates correspond to views in traditional MVC and Django views can be linked to the controllers found in traditional MVC.
Let's create an app. ‘cd’ into the first ‘helloapp’ folder and type;
python manage.py startapp cat
Running this command will create an app called cat.
To get Django to recognize our brand new app, we need to add the app name to the Installed Apps list in our settings.py file.
Go ahead and add it,
# helloapp/settings.py
INSTALLED_APPS = [
    'django.contrib.admin',
    'django.contrib.auth',
    'django.contrib.contenttypes',
    'django.contrib.sessions',
    'django.contrib.messages',
    'django.contrib.staticfiles',
    'cat'
]
Django comes with a built in lightweight web server which, while useful during development, should never be used in production.
Run the server as follows:
python manage.py runserver
If you look carefully, you will see a warning that you have unapplied migrations. Ignore that for now.
Go to your browser and access http://127.0.0.1:8000/. If all is running smoothly, you should see the Django welcome page.
We are going to replace this page with our own template. But first, let's talk migrations.
Migrations
Migrations make it easy for you to change your database schema (model) without having to lose any data. Any time you create a new database model, running migrations will update your database tables to use the new schema without you having to lose any data or go through the tedious process of dropping and recreating the database yourself.
Django comes with some migrations already created for its default apps. If your server is still running, stop it by hitting CTRL + C. Apply the migrations by typing:
python manage.py migrate
If successful, running the server now will not show any warnings.
When we ran the server, the default Django page was shown. We need Django to access our cat app when someone goes to the home page URL which is /. For that, we need to define a URL which will tell Django where to look for the homepage template.
Open up the urls.py file inside the inner helloapp folder. As you can see, there is an existing URL pattern for the Django admin site which comes by default with Django. Let's add our own URL to point to our cat app. Edit the file to look like this.
# helloapp/urls.py
from django.conf.urls import url, include
from django.contrib import admin

urlpatterns = [
    url(r'^admin/', admin.site.urls),
    url(r'^', include('cat.urls')),
]
Note that we have added an import for include from django.conf.urls and added a url pattern for an empty route. When someone accesses the homepage, (in our case http://localhost:8000), Django will look for more url definitions in the cat app. Since there are none, running the app will produce a huge stack trace due to an ImportError.
Let's fix that. Go to the cat app folder and create a file called urls.py.
Inside the new urls.py file, write this.
Inside the new urls.py file, write this.
This code imports the views from our cat app and expects a view called HomePageView to be defined. Since we don't have one, open the views.py file in the cat app and write this code.
 # cat/views.py
from django.shortcuts import render
from django.views.generic import TemplateView

# Create your views here.
class HomePageView(TemplateView):
    def get(self, request, **kwargs):
        return render(request, 'index.html', context=None)
This file defines a view called HomePageView. Django views take in a request and return a response. In our case, the method get expects a HTTP GET request to the url defined in our urls.py file. On a side note, we could rename our method to post to handle HTTP POST requests.
Once a HTTP GET request has been received, the method renders a template called index.html which is just a normal HTML file which could have special Django template tags written alongside normal HTML tags. If you run the server now, you will see the following error page:
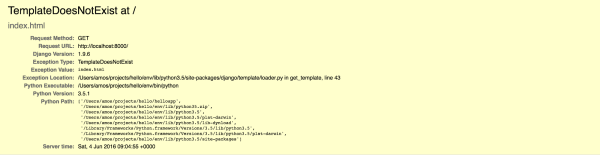
This is because we do not have any templates at all! Django looks for templates in a templates folder inside your app so go ahead and create one in your cat app folder.
mkdir templates
Go into the templates folder you just created and create a file called index.html and paste:
<!-- cat/templates/index.html -->
<!DOCTYPE html>
<html>
    <head>
        <meta charset="utf-8">
        <title>Cat!</title>
    </head>
    <body>
        <h1>Cat is up and running!!!</h1>
    </body>
</html>
Now run your server.
python manage.py runserver
You should see your template rendered.
Well done!!!
Linking Pages
Let's add another page. In your cat/templates folder, add a file called about.html. Inside it, write this HTML code:
<!-- cat/templates/about.html -->
<!DOCTYPE html>
<html>
    <head>
        <meta charset="utf-8">
        <title>Cat About!</title>
    </head>
    <body>
        <h1>Welcome to the about page</h1>
        <a href="/">Go back home</a>
    </body>
</html>
Also edit the original index.html file to look like this:
<!-- cat/templates/index.html -->
<!DOCTYPE html>
<html>
    <head>
        <meta charset="utf-8">
        <title>Cat!</title>
    </head>
    <body>
        <h1>Cat is up and running!!!</h1>
     <a href="/about/">About Me</a>
    </body>
</html>
Clicking on the About me link won't work quite yet because our app doesn't have a /about/ url defined. Let's edit the urls.py file in our cat app to add it.
# cat/urls.py
from django.conf.urls import url
from cat import views


urlpatterns = [
    url(r'^$', views.HomePageView.as_view()),
    url(r'^about/$', views.AboutPageView.as_view()), # Add this /about/ route
]
Once we have added the route, we need to add a view to render the about.html template when we access the /about/ url. Let's edit the views.py file in the cat app.
# cat/views.py
from django.shortcuts import render
from django.views.generic import TemplateView

class HomePageView(TemplateView):
    def get(self, request, **kwargs):
        return render(request, 'index.html', context=None)

# Add this view
class AboutPageView(TemplateView):
    template_name = "about.html"
Now run the server and enjoy!!!
You can read more about Django on the official Django docs.